Kafka Gateway
The Resolve Kafka Gateway Connector enables Resolve to integrate with Kafka messaging service. The gateway uses the library to build and store consumers for each (broker/topic) pair. Each consumer then gets processed against all filters with the same broker/topic. The gateway filter mechanism assumes messages are sent as JSON and parses the data out into a groovy map. You can specify logic similar to what is seen in preconditions to check the map for criteria before executing the filter script/Runbook.
Prerequisites
- Resolve Pro version 6.3.1+
- Apache Kafka server
- (optional) Kafka UI tool
Version 1.0 is designed for Resolve 6, Version 2.0 supports earlier releases of Resolve 7, and Version 3.2 is compatible with the most recent versions of Resolve.
Architecture
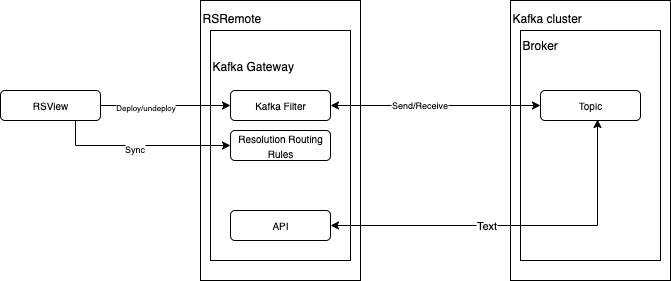
Installation
Both the gateway components and the Kafka server installation package must be installed. Server installation is not required for the gateway to function, however it does contain a number of scripts that are useful in the development efforts.
To install:
Request the Kafka Gateway package from Support.
Unzip the file
- For Unix unpack use the command
[resolve@server]$ tar - xvf rskafkagateway-x.x-sdk1.tar.gz
- For Unix unpack use the command
Confirm the unizipped files appear in
rsgateways/kafka/and view:- config - this folder contains the blueprint.properties configuration file.
- lib - this folder contains the kafkaGateway.jar file, which stores the main gateway functionality.
Navigate to the
libfolder.Copy the contents of the
libfolder into your Resolvegatewaylibsfolder. You can see that these jars are copied in the folder.animal-sniffer-annotations-1.10.jar
connect-api-0.11.0.0.jar
junit-4.12.jar
kafka-clients-0.11.0.0.jar
kafkaGateway.jar
kafka-streams-0.11.0.0.jar
okhttp-3.9.0.jar
okio-1.13.0.jar
slf4j-api-1.7.25.jarOpen the
blueprint.propertiesfile under<extracted folder>\rsgateways\kafka\configfolder. Copy all the properties from this file into the resolve installation properties, under/opt/resolve/blueprint.propertiesin the rsremote gateway properties section.blueprint properties
rsremote.receive.kafka.active=true
rsremote.receive.kafka.defaultconsumerproperties=
{"enable.auto.commit":"true", "auto.commit.interval.ms":"1000", "key.deserializer":"org.apache.kafka.common.serialization.StringDeserializer", "value.deserializer":"org.apache.kafka.common. serialization.StringDeserializer", "max.poll.records":50"}
rsremote.receive.kafka.defaultproducerproperties=
{"acks":"all", "retries":0,"batch.size":16384, "linger.ms":10, "buffer.memory":33554432, "key.serializer":"org.apache.kafka.common.serialization.StringSerializer", "value.serializer":"org.apache.kafka.common.serialization.StringSerializer"}
rsremote.receive.kafka.failover=60
rsremote.receive.kafka.heartbeat=20
rsremote.receive.kafka.implprefix=Kafka
rsremote.receive.kafka.interval=10
rsremote.receive.kafka.menutitle=KAFKA Gateway
rsremote.receive.kafka.package=com.resolve.gateway.kafka
rsremote.receive.kafka.primary=true
rsremote.receive.kafka.queue=KAFKA
rsremote.receive.kafka.sdkfield.count=5
rsremote.receive.kafka.sdkfield1.displayname=BrokerUrls
rsremote.receive.kafka.sdkfield1.name=BrokerUrls
rsremote.receive.kafka.sdkfield1.sdkdatatype=String
rsremote.receive.kafka.sdkfield1.type=text
rsremote.receive.kafka.sdkfield2.displayname=Topic
rsremote.receive.kafka.sdkfield2.name=Topic
rsremote.receive.kafka.sdkfield2.sdkdatatype=String
rsremote.receive.kafka.sdkfield2.type=text
rsremote.receive.kafka.sdkfield3.displayname=FilterCriteria
rsremote.receive.kafka.sdkfield3.name=FilterCriteria
rsremote.receive.kafka.sdkfield3.sdkdatatype=String
rsremote.receive.kafka.sdkfield3.type=text
rsremote.receive.kafka.sdkfield4.displayname=ManualCommit
rsremote.receive.kafka.sdkfield4.name=ManualCommit
rsremote.receive.kafka.sdkfield4.sdkdatatype=Boolean
rsremote.receive.kafka.sdkfield4.type=checkbox
rsremote.receive.kafka.sdkfield5.displayname=Consumer Properties
rsremote.receive.kafka.sdkfield5.name=ConsumerProperties
rsremote.receive.kafka.sdkfield5.sdkdatatype=String
rsremote.receive.kafka.sdkfield5.type=text
rsremote.receive.kafka.secondary=false
rsremote.receive.kafka.type=PUSH
rsremote.receive.kafka.uppercase=false
rsremote.receive.kafka.worker=trueCopy the contents of the blueprint file and paste it into your Resolve blueprints file located at
<resolve install folder>\bin\blueprint.properties.For Unix:
[resolve@server]$ cat rsgateways/kafka/config/blueprint.properties >>rsmgmt/config/blueprint.propertiesStop Resolve components:
[resolve@server]$ bin/stop.sh rsremote rsview rscontrolRun config.sh
[resolve@server]$ bin/config.shStart Resolve components.
[resolve@server]$ bin/run.sh resremote rsview rscontrolVerify that the Resolve Kafka Gateway is present in the menu of your Resolve instance by clicking the main menu and navigating to
Gateway Administration > KAFKA Gateway.
Filter Configuration and Deploying
To configure the Kafka gateway filter, follow these steps:
- Log in to RSView
- Open Resolve RSView and log in as an Administrator.
- Open Kafka Filter Administration Navigate to Gateway Filter Administration → Gateway Type. From the drop-down menu, select KAFKA. Verify that the Gateway (Queue) drop-down list is not blank.
- Verify Gateway Installation
- If the drop-down list is blank, the gateway is not installed properly.
- If the drop-down list is populated, continue to the next step.
- Create a New Filter
- For Resolve 6.5 and later: Click Create New.
- Complete the Filter Details
In the New Filter window, enter the following information:
- Name: Enter a name for the filter.
- Order: Defines the execution order of filters (if two filters run at the same interval).
- Active: Select the checkbox to enable the filter immediately.
- Runbook: Choose the runbook to be executed at runtime by this filter.
- Interval: Define the time interval after which the filter is executed again.
- Deploy the Filter
- Select the checkbox next to the filter you want to deploy.
- Click the Deploy button.
- Select Remove and replace filters on Gateway Queue.
- Click Confirm on the Confirm Deployment popup.
- On the Result screen, you will see Success.
HA Set Up
To set up a high availability instance of your Kafka Gateway:
- Stop all Resolve components.
- Set the following blueprint configuration on the primary rsremote. (Note: Only one primary rsremote per cluster is allowed.)
rsremote.receive.kafka.primary=true
rsremote.receive.kafka.secondary=false - Set the following blueprint configuration on the secondary resremote. (Note: Only one secondary rsremote per cluster is allowed.)
rsremote.receive.kafka.primary=false
rsremote.receive.kafka.secondary=true - Set the following blueprint configuration on the worker rsremote. (Note: Any rsremote may be a worker. Primary and secondary rsremotes may also be workers. Multiple workers are allowed.)
rsremote.receive.kafka.worker=true
(Optional) Kafka Server Installation
The Kafka Server installation is not required for this gateway. However, its application bin folder contains several scripts that are useful for development. Therefore, installing the server is recommended, but optional.
Required File:
kafka_2.11-1.0.0.tgz
Installation Instructions
Switch to the root user.
su rootExtract the archive to
/opt:tar -xzf /home/resolve/Downloads/kafka_*.tgz -C /optRename the extracted folder:
mv /opt/kafka_* /opt/kafkaChange ownership:
chown -R resolve:resolve /opt/kafka/
Verification
- Start a console producer using the same broker and topic specified in the Gateway installation steps:
/opt/kafka/bin/kafka-console-producer.sh --broker-list <single broker url> --topic ResolveKafkaInstallationTestTopic - Paste the following JSON into the console and press Enter. This will send the message to the Kafka topic:
{"TestJsonField":"FieldValue","AnotherField":"AnotherValue"}
Filter Criteria
Kafka Consumer filters work by transforming incoming JSON messages into a Map. Behind the scenes, Resolve uses groovy.json.JsonSlurper to parse the data.
- If the message pulled from the queue is not JSON, leave the Filter Criteria field blank. This is the safest approach.
- Any additional checks can be defined in the Script section.
- When the Filter Criteria field is left blank, the filter script and the associated Runbook are executed for every retrieved message.
The Filter Criteria field is treated as a Groovy script, with the JSON Map available for criteria checking. If the script returns true, the filter’s Script section executes, and any specified Runbook runs.
Example Message
{
  "Message": "Indicates that the root cause is a failed system.",
  "State": "NEW",
  "Extensibility": {
    "InternalEventHandle": "NOTIFICATION-Host 85.14.24.150 Down",
    "EventName": "Down",
    "ClassDisplayName": "Host",
    "OccurrenceCount": 1,
    "SourceEventType": "PROBLEM"
  },
  "Tags": [
    "Availability",
    "SatNet"
  ],
  "Acknowledged": false,
  "Created": "2018-08-04T20:17:36.000Z"
}
Example Filter Criteria
JSON.State.equalsIgnoreCase("NEW") &&
JSON.Acknowledged == false &&
JSON.Extensibility.EventName.equals("Down")
Example Automation
- Download the Kafka Send Message automation from: https://resolvesys.files.com/f/d7b9b4ba7d319453.
- Import the Kafka Send Message automation.
- Open the Action Definition > Properties and edit the following:
- KAFKA_BROKER_URLS: Enter your Kafka broker's URL and click Save. Remove any additional comma-separated entries if your Kafka instance has only one broker.
- KAFKA_TRUSTSTORE_PATH: Enter the path to the keystore containing the trust certificates for the Kafka server.
- KAFKA_RESOLVE_QUEUE: Enter the Kafka Gateway queue. (Note: The default will likely not need to be changed.)
- KAFKA_AUTH_MODE: Select whether the connection uses SSL. (Note: The default is SSL. If SSL is not used,
KAFKA_TRUSTSTORE_PATHdoes not need to be set.)
- Open
kafka send messageRunbook and click Execute. - Open the worksheet. All results should display in green, with details confirming that the message was delivered successfully.