How to Use the Custom Device Discovery Feature
The Custom Device Discovery feature allows you to manage and collect data from devices that are not natively supported by Insights. This guide provides the steps to configure and use this feature effectively.
Before adding a custom device, verify if Insights' native discovery process already supports it.
A list of supported devices can be found in Discovery and Dependency Mapping > Device Discovery > Supported Devices in user documentation.
Step One: Configure Custom Device
This step involves describing and integrating custom devices into Insights by adding device-specific configurations. The Custom Device configuration supports Python scripts and APIs. If you do not know your device's details but it supports an API, you can create your Custom Configuration using an API.
You will need the endpoint, username, and password to use the API option.
1.1 Access Custom Device Configuration
- Log into the Insights dashboard as an Administrator.
- Navigate to Settings > Custom Device Configuration.
The configurations you create are applied at the organization level and affect all sites within the organization.
- Click the +Add Configuration button in the top-right corner.
- Choose Script for python script or API for and API connection.
Parameters Behavior
Python Script and API Configuration
The system managers parameters differently based on their presence in the configuration:
- Parameters Present
- Username, Password, and Port: Sourced from the Service Account (created in Step 2.1)
- IP Address: Taken from the IP list.
- Parameters Absent
- The service account and IP list from the discovery process are omitted.
- The discovery process directly reads the script or connects to the API and uses the hardcoded data provided.
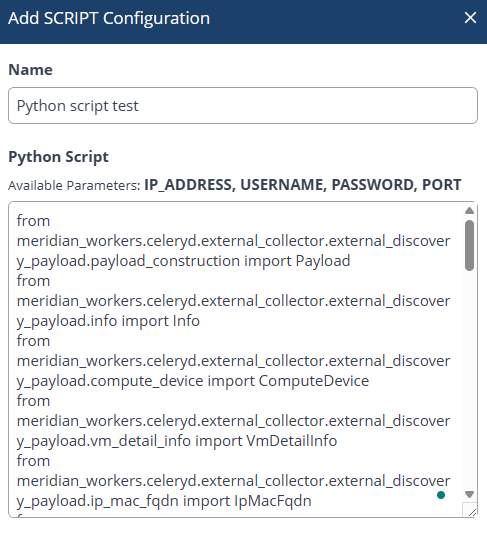
1.2a Python Script
If you select Script as the configuration type:
- A list of available parameters (
IP_ADDRESS,USERNAME,PASSWORD,PORT) will appear along with a field to enter the script.- You can access available parameters in the Service Account step and the IP List in Device Discovery.
- Enter the Python Script in the text box.
- Click Create Configuration.
To find templates for your Python Script, visit documentation API Reference > Python SDK or use the example for Describing a Compute Device below.
Describing a Compute Device
Python Sample
To test this script, update the following fields with your details:
- IP_ADDRESS
- Hostname
from meridian_workers.celeryd.external_collector.external_discovery_payload.payload_construction import Payload
from meridian_workers.celeryd.external_collector.external_discovery_payload.info import Info
from meridian_workers.celeryd.external_collector.external_discovery_payload.compute_device import ComputeDevice
from meridian_workers.celeryd.external_collector.external_discovery_payload.vm_detail_info import VmDetailInfo
from meridian_workers.celeryd.external_collector.external_discovery_payload.ip_mac_fqdn import IpMacFqdn
from meridian_workers.celeryd.external_collector.external_discovery_payload.mounted_volume import MountedVolume
from meridian_workers.celeryd.external_collector.external_discovery_payload.cpu_info import CpuInfo


info_obj = Info()

info_obj.ip_address = "198.51.100.1"
info_obj.hostname = "qa201-nce1"
info_obj.vendor = "VMWARE"
info_obj.platform = "LINUX"
info_obj.platformType = "CENTOS LINUX"
info_obj.version = "7.9.2009 (CORE)"
info_obj.serial_number = "VMWARE-56 4D 84 AE 0F 8A BA A0-A2 1F 9F 09 A9 7B 66 4B"
info_obj.model = "VMWARE VIRTUAL PLATFORM"
info_obj.is_virtual = 1
info_obj.device_type = "COMPUTE"
info_obj.device_subtype = "VM"

compute_obj = ComputeDevice()
compute_obj.vmDetailInfo = VmDetailInfo()

ip_mac_fqdn = IpMacFqdn()
ip_mac_fqdn.ipv4Addr = "198.51.100.1"
ip_mac_fqdn.phyAddr = "0150569D7A3A"

compute_obj.vmDetailInfo.ipMacFqdn = ip_mac_fqdn
compute_obj.vmDetailInfo.coresPerSocket = 4

cpu_info = CpuInfo()
cpu_info.vendor = "GenuineIntel"
cpu_info.modelName = "Intel(R) Xeon(R) CPU E5-2665 0 @ 2.40GHz"
cpu_info.processorCount = 16

compute_obj.vmDetailInfo.cpuInfo = cpu_info

compute_obj.vmDetailInfo.cpuMHz = 2400
compute_obj.vmDetailInfo.cpuTotal = 16
compute_obj.vmDetailInfo.kernelVersion = "3.10.0-1062.el7.x86_64"
compute_obj.vmDetailInfo.memoryMB = 32009

mounted_volumn_1 = MountedVolume()
mounted_volumn_1.volumeName = "devtmpfs"
mounted_volumn_1.sizeGB = 16

mounted_volumn_2 = MountedVolume()
mounted_volumn_2.volumeName = "tmpfs"
mounted_volumn_2.sizeGB = 3.2

compute_obj.vmDetailInfo.mountedVolume = [mounted_volumn_1, mounted_volumn_2]

payload = Payload()

payload.info = info_obj
payload.data = compute_obj

final_payload = payload.serialize()

print(final_payload)
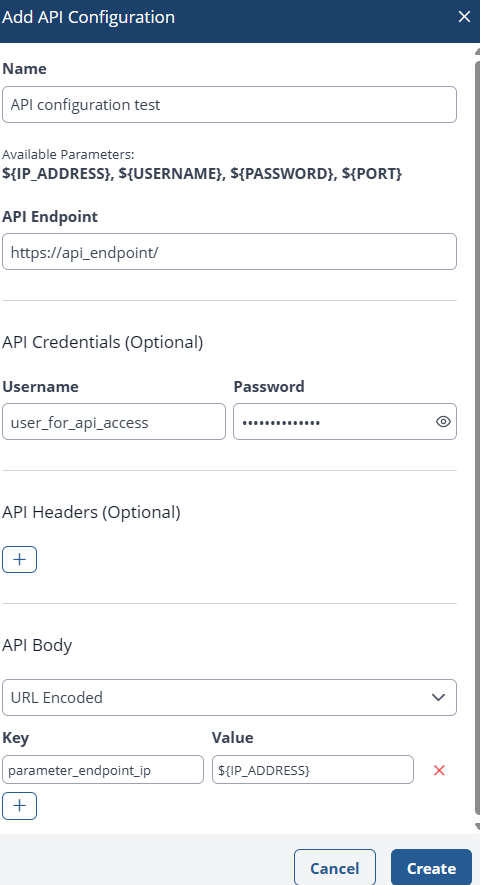
1.2b API
You can have one API that stores the descriptions of all your custom devices in a JSON format. You can configure access to that API as a custom device configuration, and it will be called every time a discovery for custom devices is running, and the API will return the JSON description for the specific device based on the IP Address parameter.
If you select API as the configuration type:
- Enter the API Endpoint, Username, and Password to access the API.
- In the API Headers section:
- Add Key and Value pairs (for example,
ip> $ {IP_ADDRESS},user > ${USERNAME},pass > ${PASSWORD}) taken from the Service Account created in Step 2.1 or the IP List in Device Discovery.
- Add Key and Value pairs (for example,
- Enter the same parameters into the Body.
- Click Create Configuration.
Example of custom device description in JSON format
Step Two: Schedule a Discovery
2.1 Create a Service Account
To schedule a discovery, you will need to first create a service account.
- Navigate to Discovery > Service Accounts
- Click the +Add Service Account button in the top-right corner.
- Enter the Service Account Name
- In the Connection Type field, select API.
- Enter your Username and Password in the next fields.
- Click Create.
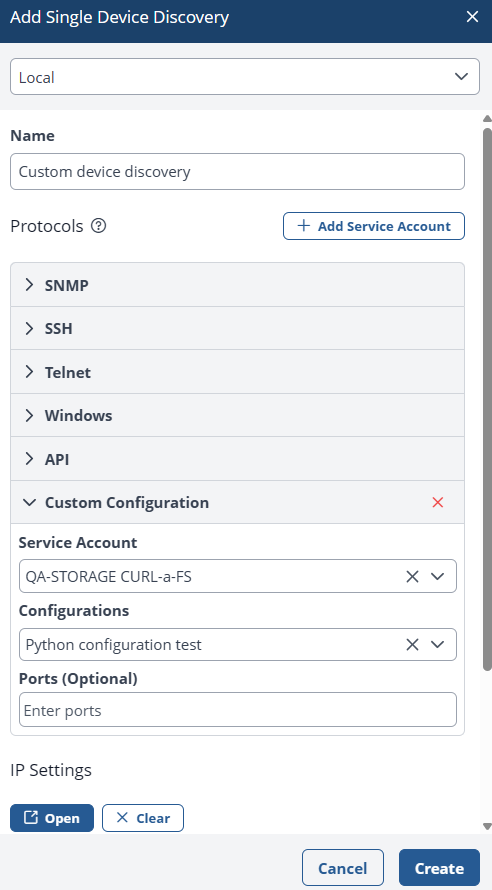
2.2a Running the Device Discovery
To set parameters for identifying the custom device:
- Navigate to Discovery > Device Discovery.
- Click the +Add Discovery button in the top-right corner and select Single discovery.
- Enter a discovery Name.
- Under Custom Congfiguration select the Service Account you created in Step 2.1 and the Configurations you created in step 1.2a or 1.2b.
- Under IP Settings select FQDN/IP from the drop-down list and enter the IP addresses of the custom devices.
- Click Save to create the custom device discovery.
The Username, Password, and Port (from the Service Account) and the IP Address (from this step) are passed as parameters to the selected Custom Device configuration, in the cases where the configuration uses parameters.
2.2b Scheduling the Device Discovery
You can also schedule the start of the Device Discovery. After completing Step 5 above:
- Click the Schedule toggle.
- Enter a Start-End Date.
- In the Days and Hours fields, enter the interval for your schedule.
Deleting Custom Device Configurations
Before deleting a Custom Device configuration, ensure that it is not part of a Discovery schedule. Otherwise, the next time the discovery runs, it will fail to discover the device.
Viewing Scheduled Discoveries
To view scheduled discoveries, navigate to Settings > Custom Device Configuration. Then, click the edit pencil to the left of the Custom Device Configuration Name. In the popup window, select the Used In tab to see a list of all scheduled discoveries (one-time executed discoveries are not shown).
Step Three: Review Device Discovery Requests
Now, you will see your custom device discovery requests on the Discovery - Device Discovrty page.
3.1 View Discovered Devices
Once your Discovery Requests are complete, you can view a list of all devices:
- Navigate to the lefthand menu and find Inventory > Devices.
- Click any of the devices to see detailed information.